Automating BGP Analysis: A Deep Dive into the BGPHorizon API & MCP
Add intelligent, automated BGP monitoring to your workflows. This step-by-step guide walks you through how to use BGPHorizon's API and MCP. It covers four things: connecting an AI assistant to the platform through our MCP server, auditing your network with it, setting up alerts for the prefixes and ASNs you care about, and feeding those alerts into your own tooling through the API. You do not need to run any infrastructure of your own.
The problem this guide addresses
Your prefixes reach the rest of the internet through BGP. Any network connected to the global routing table can announce a route for your addresses, and many networks will accept it. When that happens, traffic meant for you goes somewhere else. In the Virtualizor incident in August 2026, which we wrote up separately, traffic for part of Hetzner's address space was diverted for about 33 hours, and the attacker obtained a valid TLS certificate for the affected domains while it lasted.
In the AI/LLM era, attacks (in general) are becoming easier for attackers, and BGP attacks are no different. A script can pull every ROA from the public RPKI repositories, list the ones with a loose max-length, and compare them against what is announced. That used to be a research project, and now it is an afternoon with a scripting language and an AI model to write the code/tooling to accomplish a stealthy hijack.
The same tooling works for defenders. The checks an attacker would run against your network are the checks you should run first. An AI assistant with access to routing data can run them for you, explain the results in plain language, and tell you what to change. That is one of the many BGPHorizon capabilities.
What you need before you start
- A BGPHorizon account. Register for free here.
- The ASNs and prefixes your organization announces. If you do not know them, ask your upstream provider, or search your organization's name in BGPHorizon and read the registry results.
- An AI client that supports MCP. The examples use Claude Code and Claude Desktop. Cursor, VS Code, Gemini CLI, ChatGPT and the OpenAI Agents SDK also work, and the MCP docs page has a config block for each.
- Optional: a Slack or Discord channel, or any HTTP(S) endpoint you control, to receive custom webhook alerts. (You can receive alerts via email from BGPHorizon as well)
Step 1: Create an API key
Sign in, open your account panel, and go to the API tab. Give the key a name that says where it will be used, for example "Claude Desktop, laptop" or "SOC webhook server". Click Create key and copy it. It starts with bgps_.
Each key has its own usage count in the panel, and you can revoke one without breaking the others.
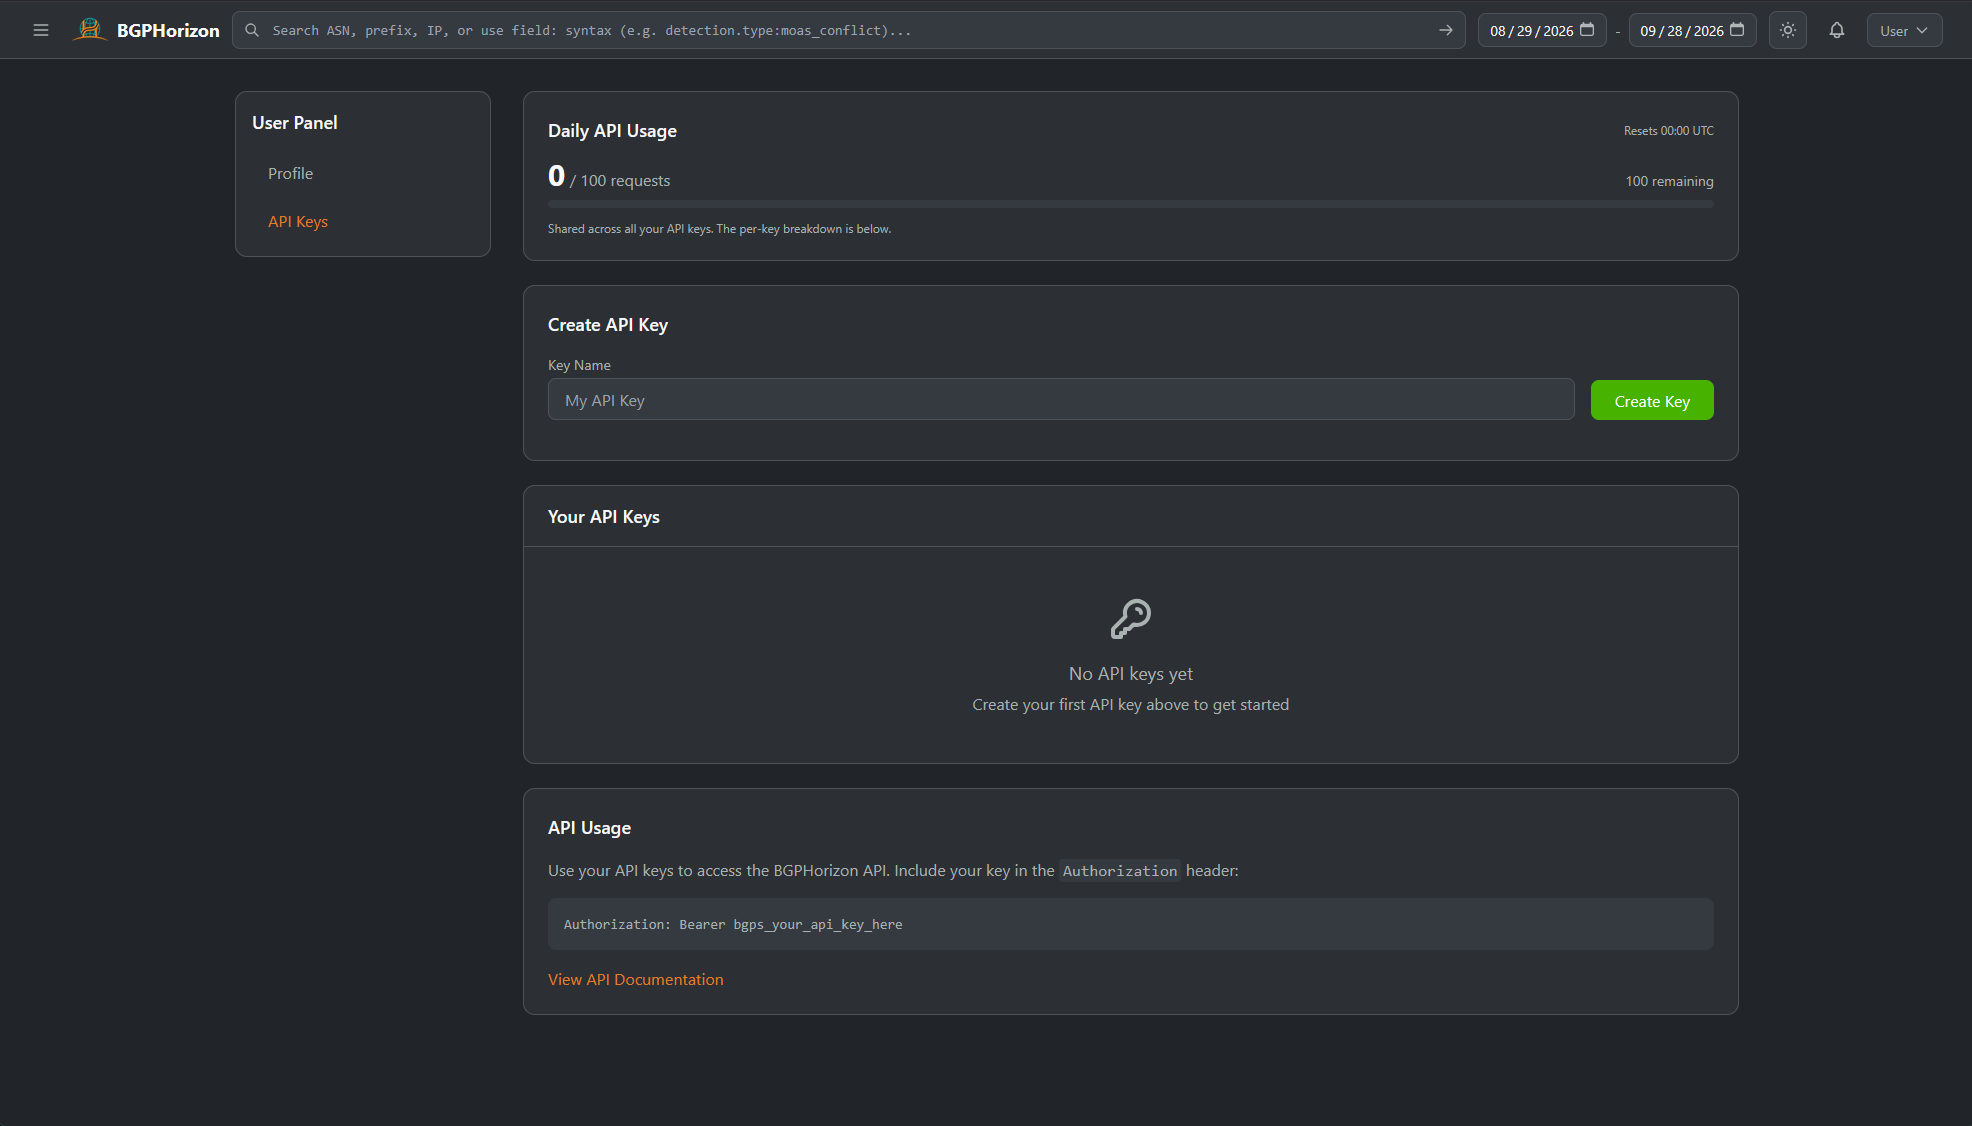
All your keys share 100 API requests per day. This is actually plenty for monitoring your own networks. The panel shows how much of it you have used today, and it resets at 00:00 UTC.
Step 2: Connect your AI client to the MCP server
MCP (Model Context Protocol) is the standard way AI assistants call external tools. Our MCP server sits in front of the BGPHorizon API and turns it into a set of tools the model can call on its own: look up an ASN, audit a network, check whether an announcement would be RPKI-valid, read your alerts, and so on.
The hosted server at https://bgphorizon.com/mcp needs nothing installed. Most clients connect by signing in: you add the URL, a BGPHorizon page opens, you log in and click Allow. You do not need to copy the API key from step 1 for this. Signing in creates a key for that client, which shows up in your API tab. It lasts 90 days, after which the client asks you to sign in again, and you can revoke it there at any time.
If you would rather run the server yourself, the same open-source code is at github.com/bgphorizon/bgphorizon-mcp. Both options call the same API, so your limits and access are identical either way.
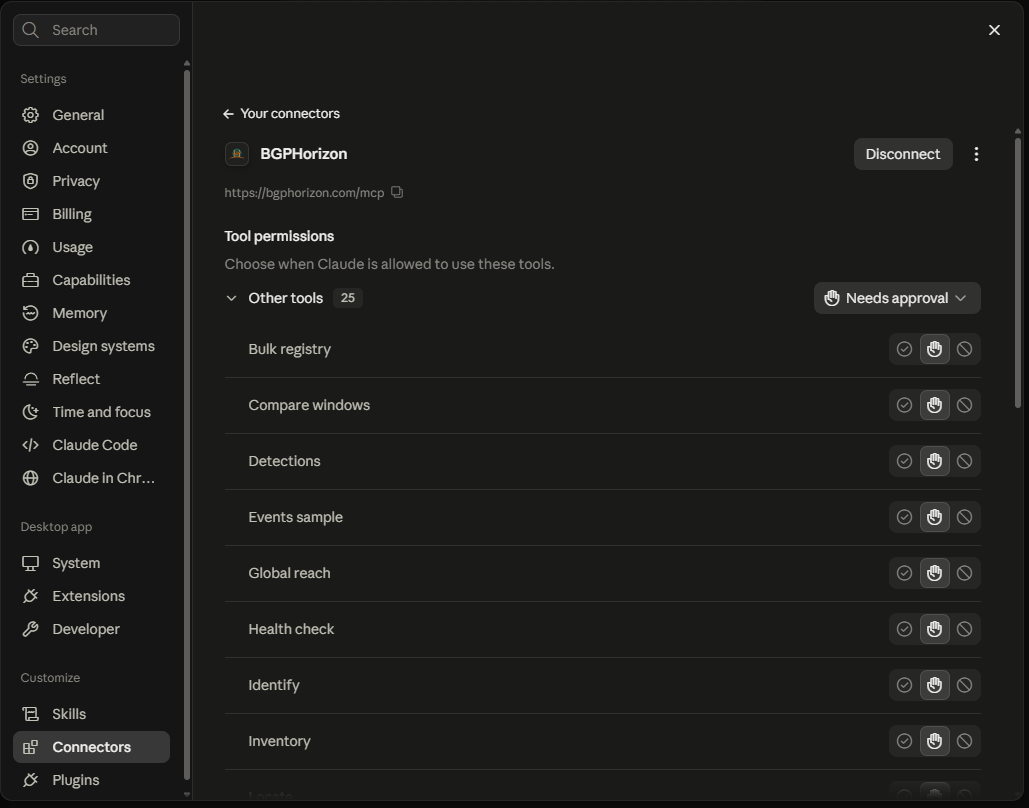
Claude Desktop
- Open Settings → Connectors and click Add custom connector.
- Enter
BGPHorizonas the name andhttps://bgphorizon.com/mcpas the URL. Leave the advanced OAuth fields empty. - Click Connect. Your browser opens the BGPHorizon sign-in page. Log in if needed, check that it says you will be sent back to
claude.ai, and click Allow.
The BGPHorizon tools then appear under the connector icon in the message box.
ChatGPT/Codex Desktop
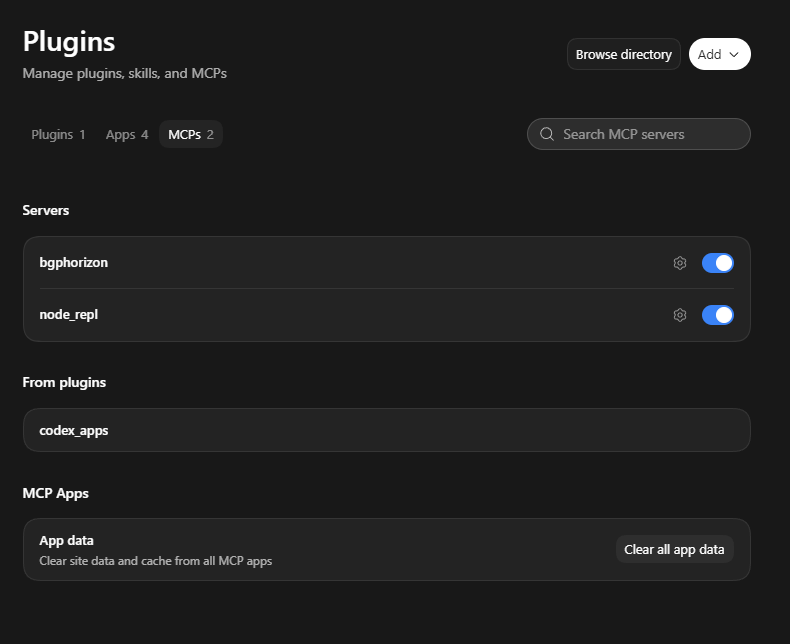
- Open Edit → Settings → Plugins and click Add → Add MCP Server
- Enter
BGPHorizonas the name and change the Type to Streamable HTTP - Enter
https://bgphorizon.com/mcpas the URL and leave everyhting else blank. - Your browser opens the BGPHorizon sign-in page. Log in if needed, and click Allow.
Claude Code
Run this once in a terminal:
claude mcp add --transport http bgphorizon https://bgphorizon.com/mcp
Start Claude Code, type /mcp, select bgphorizon and choose Authenticate. Allow access in the browser page that opens. /mcp then lists bgphorizon as connected.
Cursor, VS Code and other clients
Clients that support MCP sign-in only need the URL:
{
  "mcpServers": {
    "bgphorizon": { "url": "https://bgphorizon.com/mcp" }
  }
}
Scripts, agents and clients without sign-in
Use the API key from step 1 as a bearer token. For Claude Code:
claude mcp add --transport http bgphorizon https://bgphorizon.com/mcp \
  --header "Authorization: Bearer bgps_your_key_here"
The MCP setup guide has the equivalent configuration for every other client
Step 3: Audit your own network
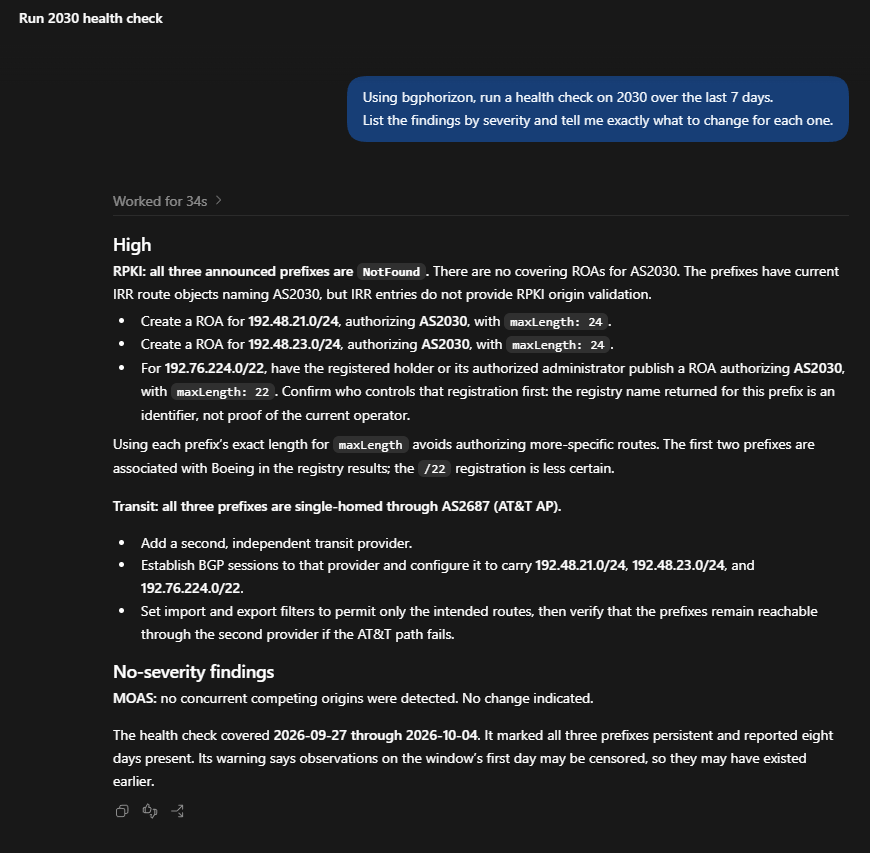
This is the most useful single thing you can do with the MCP server. The health_check tool runs seven checks against an ASN you control and returns each finding with a severity and a specific fix. Ask for it in plain language:
Using bgphorizon, run a health check on AS64500 over the last 30 days.
List the findings by severity and tell me exactly what to change for each one.
Replace AS64500 with your own ASN. The server also ships a prompt called audit_my_network that runs the same audit with a fixed method and output format. Most clients list prompts in a menu next to the tools.
The checks, and what each one means for you:
| Check | What it looks for | Why an attacker cares |
|---|---|---|
rpki |
Announced prefixes with no ROA | Without a ROA, networks that validate routes cannot tell your announcement from a forged one |
maxlength |
ROAs that authorize much longer prefixes than you announce | A loose max-length lets a forged-origin more-specific validate as RPKI-valid. The Virtualizor hijack passed RPKI this way |
irr |
Prefixes with no IRR route object, or an object naming the wrong origin | This isn't a huge deal, but IRR does help other networks somewhat validate legitimacy. |
moas |
Other ASNs announcing your prefixes | Either a hijack in progress or a configuration. Network operators will know best. |
visibility |
Prefixes seen by far fewer networks than their siblings | A sign of filtering or a provider problem, and a gap an attacker's more-specific can fill |
transit |
Prefixes reachable through one upstream only | One provider outage or mistake takes them offline. |
unrouted |
Allocated space you never announce | Nobody is announcing it, so a squatter causes no conflict anyone would notice |
The recommendations from the health_check tool are great for an initial diagnosis of what an attacker's perspective is. For most small networks the list comes down to two or three changes in your RIR portal: create the missing ROAs, set max-length equal to the longest prefix you announce, and update or delete stale IRR objects. However, network operators know best about what is feasible and what isn't. For example, sometimes AI gives recommendations on the transit check. Having multiple upstream providers isn't easy or cheap. So in your health_check prompt, add to to it something like:
Using bgphorizon, run a health check on AS64500 over the last 30 days.
List the findings by severity and tell me exactly what to change for each one. I don't care about your transit findings. Those are unavoidable and known.
This helps you only focus on what is important to you.
Step 4: Check changes before you make them
Before you create a ROA, move a prefix to a new provider, or announce new space, ask the assistant to check it. The validate_announcement tool tells you whether the announcement would be RPKI-valid, whether an IRR object exists for it, who has announced it recently, and whether the space changed registered holder in the last 90 days.
Using bgphorizon, I'm about to announce 198.51.100.0/24 from AS64500.
Run a preflight check and tell me if anything will block it.
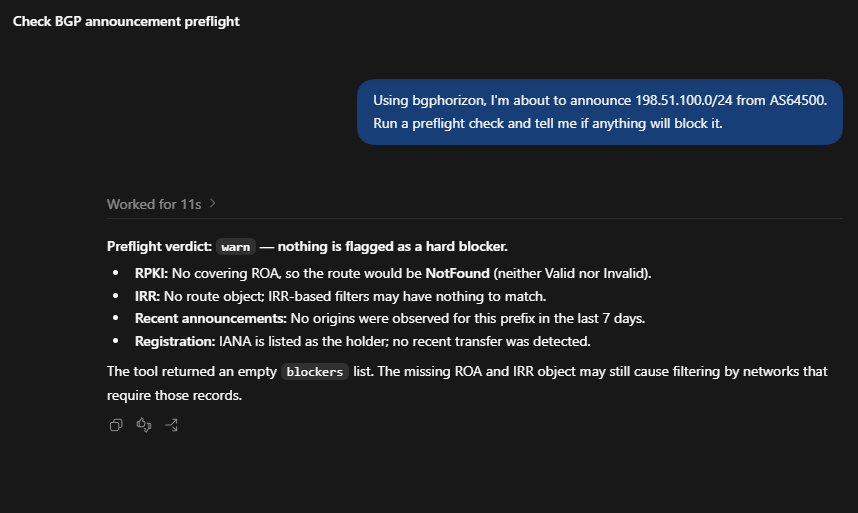
The answer comes back as clear, warn or blocked, with the reason. If you bought or were assigned space recently, pay attention to the recently-transferred flag. Transferred blocks often still carry the previous holder's ROAs, and your announcement will be RPKI-invalid until those are replaced.
Run the same check again after the change to confirm the status moved. RPKI data takes time to propagate, so if it still says blocked right after you publish a ROA, wait an hour and ask again.
Step 5: Set up monitors and alert channels
The audit covers your own configuration. Monitors cover what other networks do with your space. A monitor watches one prefix or one ASN and sends an alert when a detection on it turns anomalous.
Monitors and channels are set up in the web app. Start with the channel, since a monitor needs somewhere to send alerts.
Create a channel
Go to Channels and click New channel. Pick the type:
- Slack or Discord: paste an incoming webhook URL from that workspace.
- Webhook: any HTTPS endpoint you control. Add a signing secret so your endpoint can verify each request came from us (see step 6).
Email alerts go to your account address and are switched on in the account panel.
Click Send test on the channel before you rely on it.
Example alert from another test conducted:

Create a monitor for each of your prefixes and ASNs
Go to Monitors and click New monitor.
- Choose Prefix or ASN. For most organizations the right setup is one ASN monitor per ASN you operate, plus one prefix monitor per covering block you hold.
- On prefix monitors, tick Include more-specifics. This is the setting that catches a forged
/24carved out of your/22. Without it, you only hear about the exact prefix. - Pick detection types. If you are unsure, select all of them and narrow it later once you see which ones are noisy for your network.
- Attach the channel you created.
- Leave Ignore alerts from these ASNs empty for now. It is for providers or DDoS mitigation services that are allowed to announce your space. Add them only once you have confirmed the arrangement.
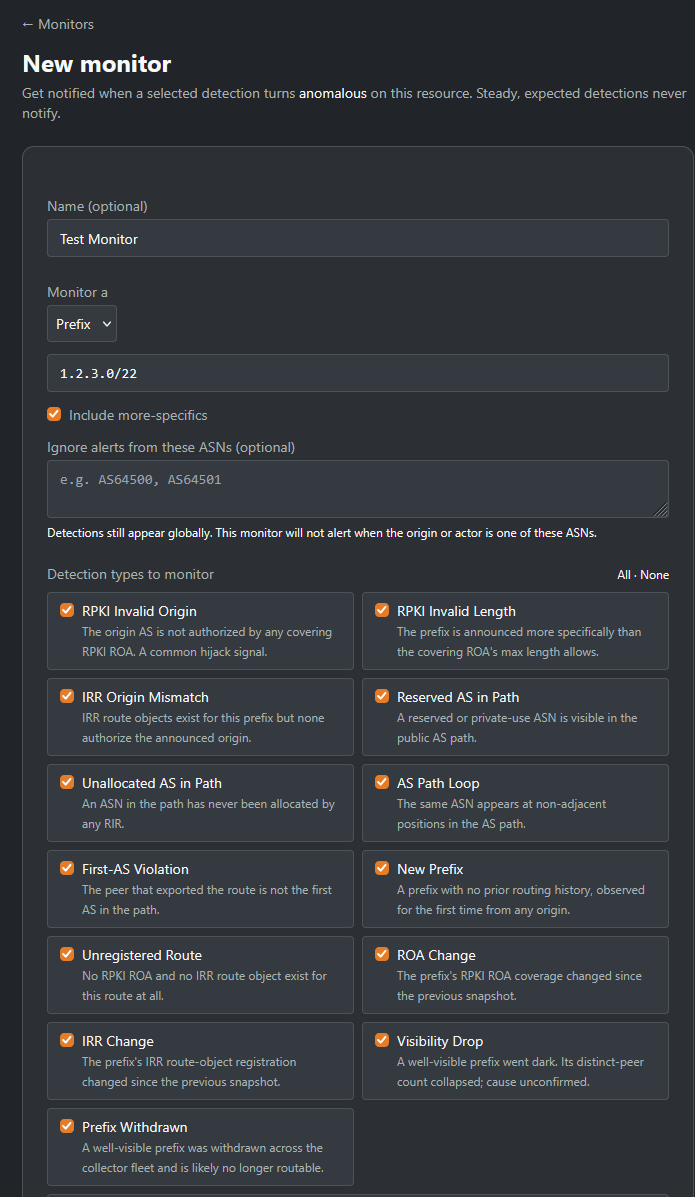
The detection types that matter most for protecting your own space, by the label shown in the form:
| Detection | What it means |
|---|---|
| New Origin | A prefix and origin pairing that has never been seen before. With more-specifics included, this fires for a new, unannounced sub-prefix of your space. It defaults to medium severity and above, which leaves out your own routine deaggregation |
| RPKI Invalid Origin | Someone announced your space from an ASN your ROA does not authorize |
| RPKI Invalid Length | The origin is authorized, but the prefix is longer than your ROA allows |
| MOAS Conflict | Two or more ASNs announced the same prefix at the same time |
| IRR Origin Mismatch | The announcing ASN does not match your IRR route objects |
| ROA Change | A ROA covering your prefix was added, removed or edited. Useful for catching a change nobody on your team made |
| Prefix Withdrawn | A prefix that was widely visible has been withdrawn almost everywhere |
Monitors only alert on anomalous detections. A condition you have lived with for weeks, such as a prefix that has never had a ROA, shows up on the prefix page but does not page you every day.
Step 6: Send alerts into your own systems
A webhook channel sends every alert as a JSON POST. This is how alerts get into a SIEM, a ticketing system, an on-call pager, or an automation that runs the MCP triage for you. The body looks like this:
{
  "event": "bgp_detection",
  "title": "203.0.113.0/24 · AS64500",
  "detection_type": "origin_mismatch_new",
  "severity": "high",
  "prefix": "203.0.113.0/24",
  "actor_as": 64500,
  "origin_as": 64500,
  "baseline_asns": [64496],
  "prefix_status": "new_more_specific",
  "incident_id": "…",
  "url": "https://bgphorizon.com/notifications"
}
actor_as is the network that made the announcement. baseline_asns are the networks that registry data and routing history expect to hold the space. When the two differ, someone other than the expected holder is announcing it. A prefix_status of new_more_specific means the prefix is a longer piece of a block that was already routed, which is how sub-prefix hijacks appear.
If you set a signing secret on the channel, every request carries an X-BGPHorizon-Signature header. Check it before trusting the payload. In Python:
import hashlib
import hmac

def is_from_bgphorizon(raw_body: bytes, header: str, secret: str) -> bool:
    expected = "sha256=" + hmac.new(secret.encode(), raw_body, hashlib.sha256).hexdigest()
    return hmac.compare_digest(expected, header or "")
Compute it over the raw request bytes before any JSON parsing. Parsing and re-encoding changes the bytes, and the check will fail.
Step 7: Triage an alert with the assistant
When an alert arrives, paste the prefix and time into your AI client and ask it to triage:
Using bgphorizon, triage the alert on 162.55.80.0/24 from 28 August 2026 at 20:57 UTC.
Who announced it, through which networks, is it still active, and what should I do?
That prefix is the Virtualizor hijack, and running this prompt against it is a good way to see what the assistant does with a real incident before you need it. It should find the detection, check the origin history, and read the AS paths. The announcement carried Hetzner's ASN as its origin, but every path reached it through AS62390 and AS6204, two networks with no role in Hetzner's space.
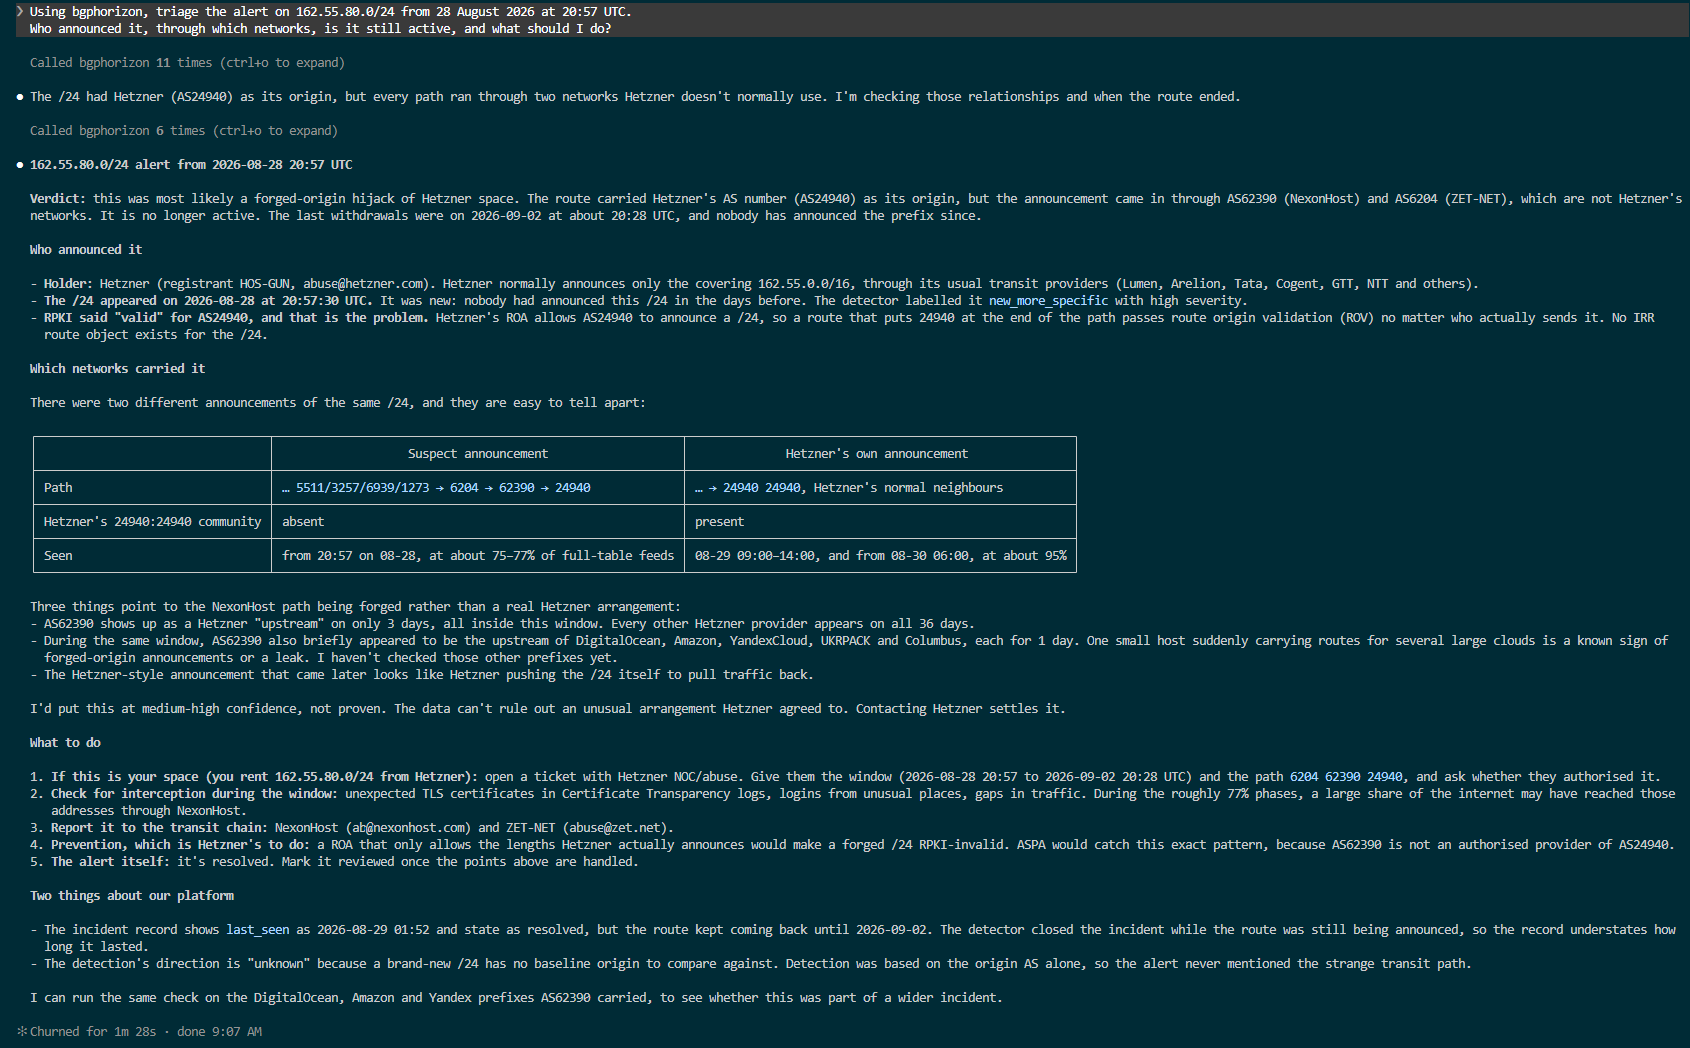
Two habits keep the assistant's answers correct, and the MCP server is built around both. The first is persistence: a prefix seen on 2 days out of 60 is a transient blip, not a change of ownership. The second is attribution: a spike seen from one collector is usually a measurement artifact at that collector. Every tool response carries a warnings list that flags both cases. If a conclusion looks stronger than the evidence, ask the assistant to show you the warnings.
It is very important to note: When analyzing an incident like the Virtualizor hijack with a less capable model, it may determine that this is not an issue. The screenshot above is with Opus 5.5, while Luna 6 has a very different conclusion:
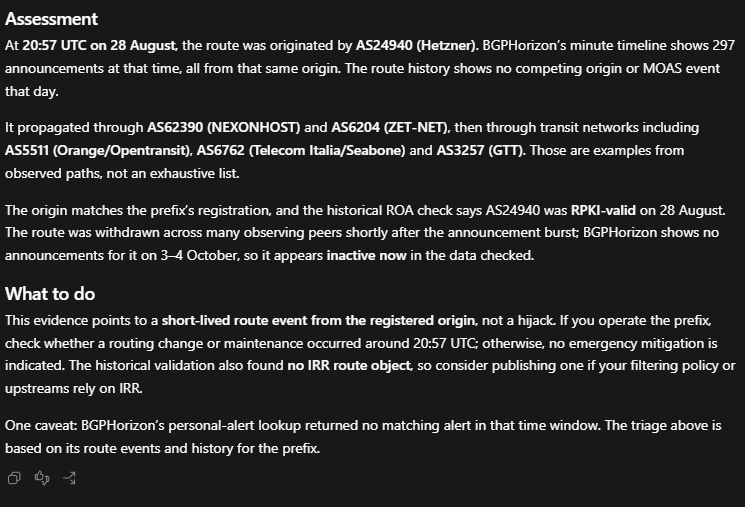
If using OpenAI, a more capable model like Astra (as of October 2026) would probably yield better results.
Step 8: Automate it with the API
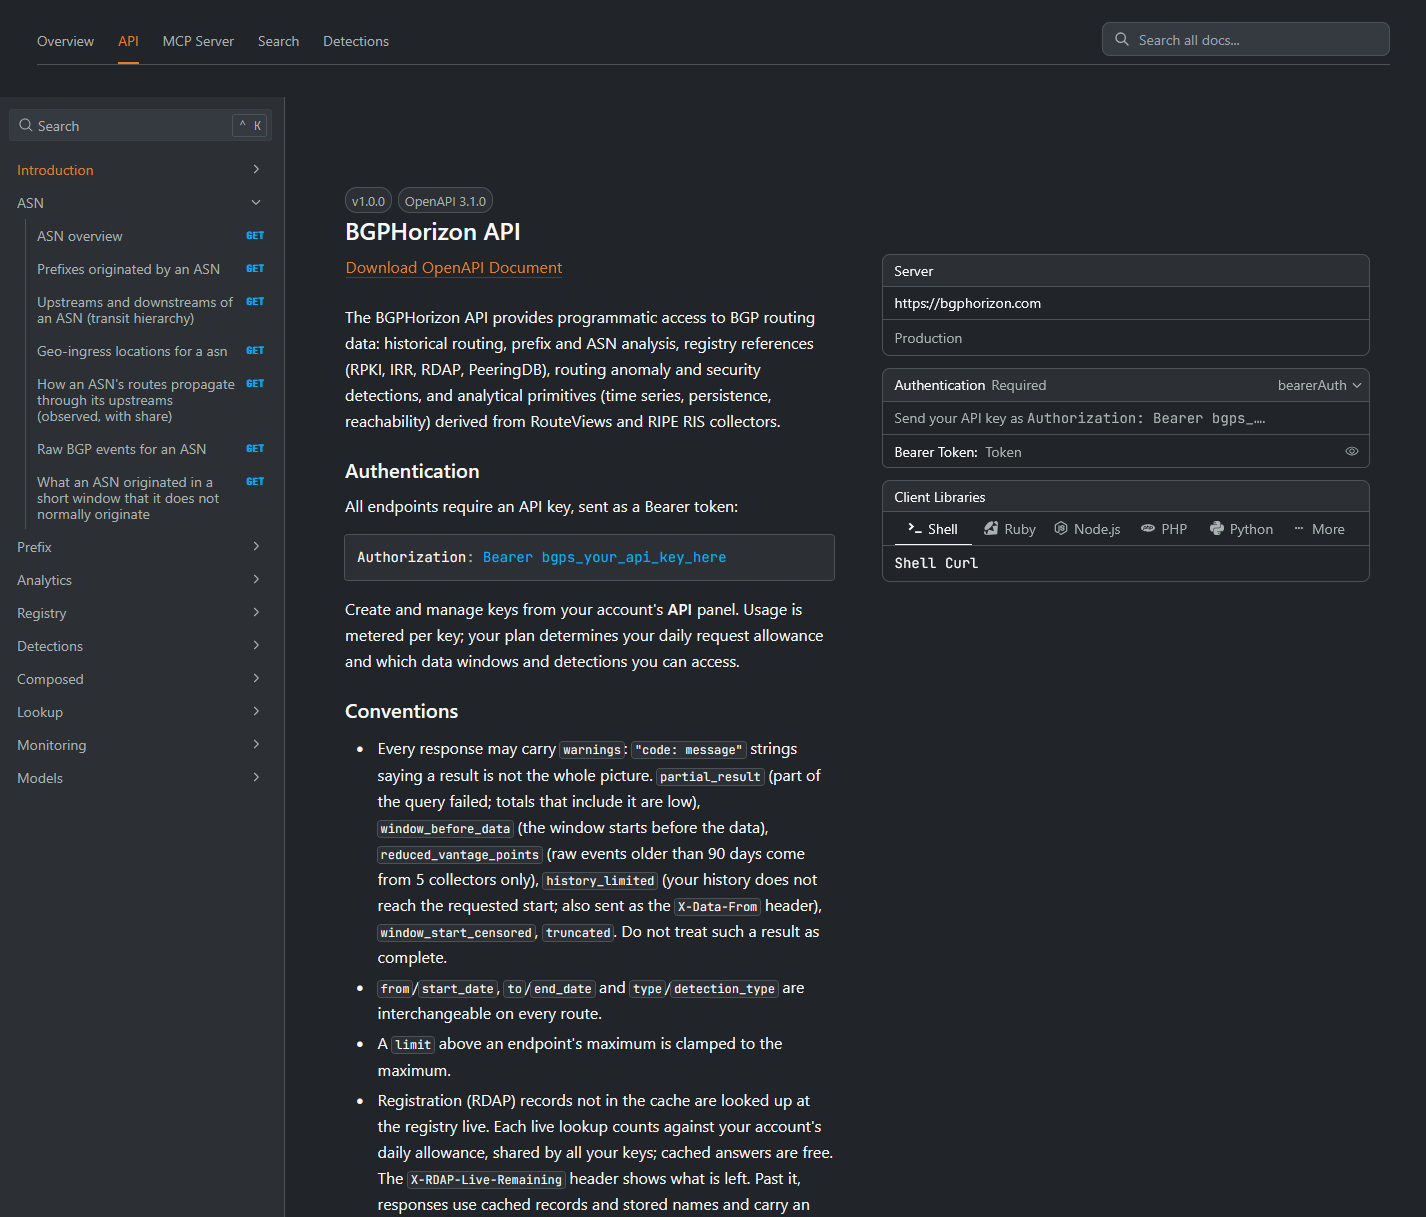
Everything the MCP server does goes through the REST API at https://bgphorizon.com/api/v1, and you can call it directly. Pass your key as a bearer token:
export BGPHORIZON_API_KEY=bgps_your_key_here

# Every alert your monitors fired since yesterday
curl -s -H "Authorization: Bearer $BGPHORIZON_API_KEY" \
  "https://bgphorizon.com/api/v1/notifications?from=$(date -u -d yesterday +%F)"

# Anomalous detections where someone else claimed your ASN's space
curl -s -H "Authorization: Bearer $BGPHORIZON_API_KEY" \
  "https://bgphorizon.com/api/v1/detections/asn?asn=64500&anomalous=true&role=baseline"

# ROAs currently covering one of your prefixes
curl -s -H "Authorization: Bearer $BGPHORIZON_API_KEY" \
  "https://bgphorizon.com/api/v1/rpki/prefix?prefix=198.51.100.0/24"
role=baseline is the filter defenders want. It returns incidents where your ASN was the expected holder and another network made the claim, and it leaves out incidents about your own announcements.
A daily report needs no AI at all. This script prints yesterday's high-severity alerts, one per line. Run it from cron and pipe the output wherever your team reads it:
#!/usr/bin/env bash
set -euo pipefail
since=$(date -u -d yesterday +%F)
curl -s -H "Authorization: Bearer $BGPHORIZON_API_KEY" \
  "https://bgphorizon.com/api/v1/notifications?from=${since}&severity=high" |
  jq -r '.alerts[] | "\(.fired_at)  \(.detection_type)  \(.prefix)  AS\(.actor_as)"'
For a written summary, ask the assistant instead:
Using bgphorizon, summarize my alerts from the last 7 days.
Group them by monitor, flag anything still active, and leave out informational ones.
That calls my_alerts and my_monitors. Doing it weekly also shows you which monitors are noisy and which have been silent for a long time. A monitor that has never fired is worth a second look, since it can mean a typo in the prefix.
The full endpoint reference, with request and response examples, is in the API documentation.
What this setup cannot see
BGPHorizon reads BGP updates from public route collectors. Those collectors peer with a few hundred networks, which is a large sample of the internet's routing but not all of it. A hijack that stays inside one provider's customers and never reaches a network that feeds a collector will not appear.
Routing data shows what was announced, by whom, and when. It cannot show why. An alert tells you that an unexpected network announced your space. Whether that was an attack, a provider's mistake or a DDoS mitigation service doing its job is something only the people involved can confirm.
The assistant is only as good as the data it is given and the checks it runs. Treat its answers as a draft from a colleague. Read the evidence it cites, and confirm anything you plan to act on in the web app before you change your configuration or contact another network.